Using python API
Python API can be used to automate MultiTool Simulator testing.
Installing necessary python modules
Needed python modules are recommended to be installed using python’s virtual environment. Installation in virtual environment prevents possible dependency conflicts between existing and MTS installation required python modules.
Creating virtual environment into directory structure
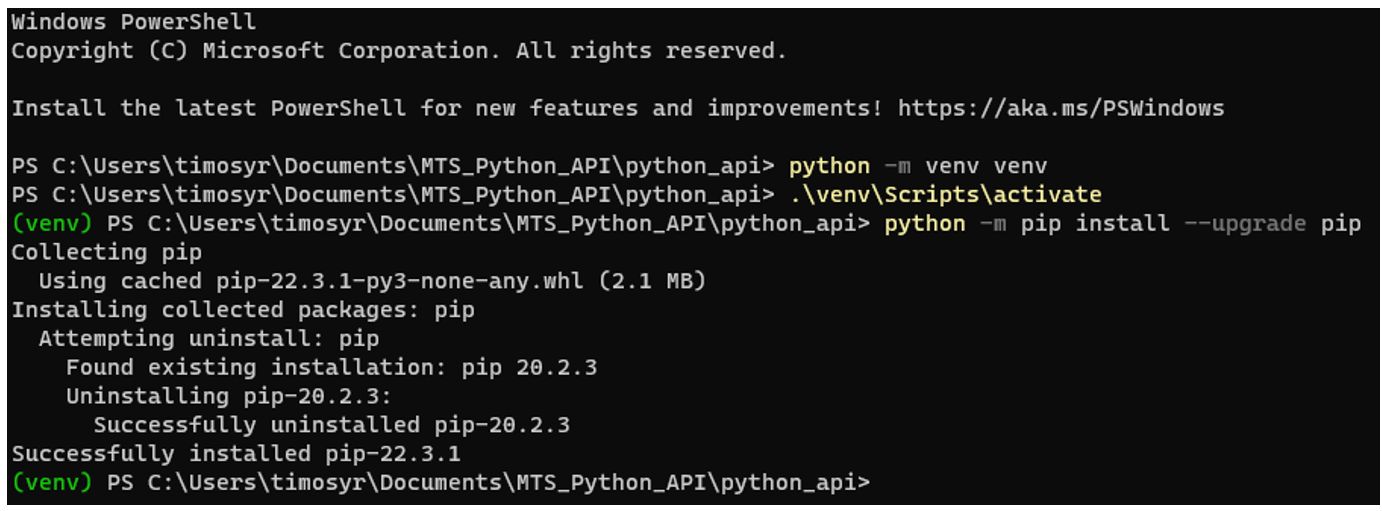
The following commands are executed by Windows Powershell command prompt. The following example shows virtual environment creation into a separate subfolder created into the MultiTool Creator project folder.
Browse into the correct directory and then create and activate the virtual environment. Install Pip package installer in the virtual environment:
python -m venv venv
.\venv\Scripts\activate
python -m pip install --upgrade pip
Installing MultiTool Simulator python API packages
MultiTool Simulator requires two separate installations of python modules, pycommal and multitool_simulator. The pycommal module is dependent of the used python version. The MultiTool Simulator supports python 3 versions 3.8, 3.9 and 3.10.
Pycommal module is installed by pip using the following command:
pip install "c:\Program Files (x86)\Epec\MultiTool Simulator\MTS Python API\pycommal-<version>-cp<python version>-cp<python version>-win_amd64.whl".
The same directory also contains versions of the same python module for 32bit installation of python 3.
pycommal-<version>-cp<python version>-cp<python version>-win32.whl
The example below shows the installation of pycommal using python 3.9 64 bit version.

MultiTool Simulator python module is installed by pip with the following command:
pip install "c:\Program Files (x86)\Epec\MultiTool Simulator\MTS Python API\multitool_simulator-<version>.post0-py3-none-any.whl".
This command will also install all necessary library dependencies to the virtual environment.
Multitool_simulator module is not dependent on different versions of installed python, as long as it is supported by MultiTool Simulator (python 3 versions 3.8, 3.9 and 3.10.).
Python script examples
Importing modules
from mts import (create_api_client, create_can_message, create_system,
delete_system, get_available_system_names, get_system_info)
Creating an API client
A client is needed for connecting to a running MTS server instance. 4972 is the default port number. This can be changed in the MTS.
client = create_api_client("http://localhost", 4975)
Creating a new system
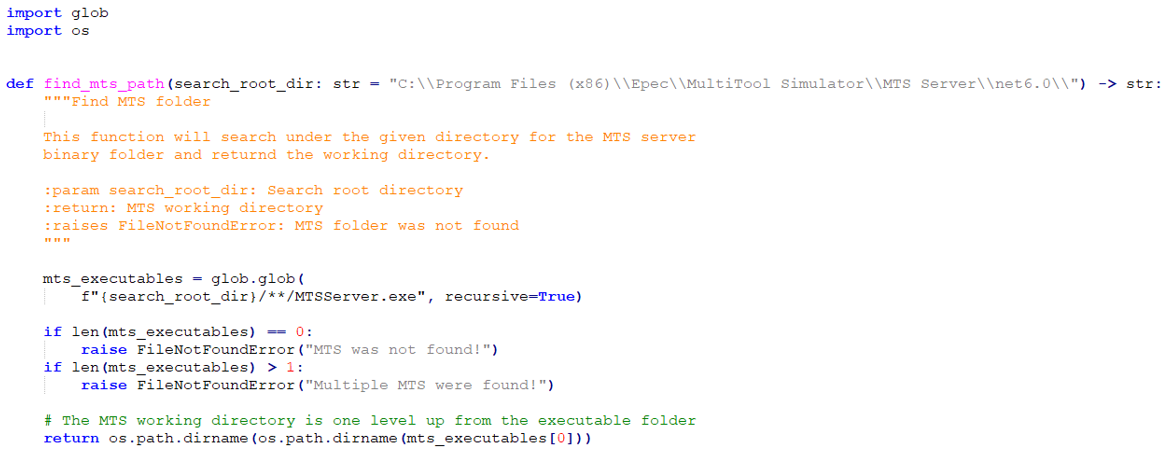
Create a new system from the MultiTool Creator export XML. The XML file path must be absolute as the MTS working directory is not known.
xml_path = os.path.abspath("../MTS/VCUConfiguration.xml")
system = create_system(client, xml_path)
Getting basic information for the system
Fetch the basic version and topology information for the system. This information will be cached as it cannot change after system creation.
system_info = get_system_info(system)
Starting the system
started = system.start()
print(f"\nSystem was started: {started}")
Writing a simulation value
Write a value to a specific simulation variable. Optionally write status bits and lock the variable.
system.write_value("Name of variable", Value to write, 1)
Example:
system.write_value("Cabin.Temperature", 123.4, 1)
Reading simulation value
Read a specific simulation variable and return its value and status bits.
system.read_value("Name of variable")
Example:
value = system.read_value("Cabin.Temperature")
print(f"\nRead variable value:\nCabin.Temperature: {value[0]}, status {value[1]}")
Reading CAN message
Read a single CAN message from a channel. When network parameter is given the message is read from that network only. In this case messages from other networks prior to that in the buffer are discarded.
Example:
message = system.read_can_message()
print(f"\nRead CAN message from any network:")
print(f" Baudrate: {message.baudrate}")
print(f" ID: {message.identifier}")
print(f" Flags: {message.flags}")
print(f" Length: {message.data_length}")
print(f" Data: 0x{message.data.hex()}")
Reading CAN message with a filter
Read multiple CAN messages from a channel. When network parameter is given messages are read from that network only and messages from other networks are discarded.
Example:
messages = system.read_can_messages(expected_id=1, max_wait_duration=1, max_messages_read=10)
print(f"\nReceived {len(messages)} matching messages during the timeout")
Writing a CAN message
A can message must be created before sending.
Example:
message = create_can_message(1234, b"\x01\x02\x03\x04", 125)
system.write_can_message("CANopen", message)
Using value sets
Value set can be used to save a specific state of the system simulation into a file, and to restore the system to a previously known state.
Getting previously created value sets
Returns a list of value sets created in the system.
Example:
valuesets = get_value_sets(system)
Creating a value set
Creates a value set with the specified name and values.
Returns a boolean value indicating whether a creation was successful or not.
Example:
create_value_set(system, "ratio", [("Simulated1.PWFM_RATIO_PWFM_1_3", 800, 0)])
Reading a value set
Returns a previously created valueset. Returns a boolean value indicating whether a creation was successful or not.
Example:
Valueset = read_value_set(system, "ratio")
Storing the system state to a value set
Stores current system values to a value set with the specified name. Returns a boolean value indicating whether a creation was successful or not.
Example:
store_value_set(system, "SystemValues")
Writing a value set
Set the system simulation values to values stored in a value set with the specified name.
Returns a boolean value indicating whether a creation was successful or not. Note: If writing whole system value set, it is recommended to leave values unlocked.
Example:
write_value_set(system, "ratio", False)
Releasing control of output values after writing a stored system valueset
Release all values
Release control of all values. Returns a boolean value indicating whether a creation was successful or not.
Example:
Result = release_all_values(system)
Release values
Release control of selected values. Returns a boolean value indicating whether a creation was successful or not.
Example:
Result = release_values([“value_1”, “value_2”, “value_n”])
Release value
Release control of selected value. Returns a boolean value indicating whether a creation was successful or not.
Example:
Result = release_value(“value1”)
Deleting a value set
Delete a simulation value set with the specified name.
Returns a boolean value indicating whether a creation was successful or not.
Example:
Result = delete_value_set(system, "valueset_name")
Stopping the system
system.stop()
Deleting system
Delete MTS system. Either give the system object or the system name. If both are given, the system object is used.
|
Dashboards and simulations made in MTS webUI are also deleted when using delete_system python command.
|
Example:
delete_system(client, system_info.name)
Using Robot Framework
The special keyword designed functions can be found for the system in file mts.api.system_functional.py. Server control functions are in mts.api.control.py.
Below is an example for starting, listing, and stopping the system.
example_3_robot_framework.robot

helpers.py